

An Initial Coin Offering (ICO) is a means of seed funding and crowdfunding through the issuance of a new cryptocurrency or cryptographic token. These tokens, which are issued mainly via Ethereum’s blockchain, are used to raise capital for a startup or a specific project. Projects sell their issued coins or tokens in exchange for bitcoin and/or ether. An ICO is similar to an initial public offering (IPO).
ICOs represent a relatively new financial procedure that has become one of the hottest topics in the financial industry. Many economists and financial observers consider ICOs a form of unregulated fundraising, while others view them as innovative models for venture funding. Moreover, whether or not an ICO token can be considered a security represents a major debate for legislators in many countries across the globe.
There are currently more than 1,500 coins available for trading on various cryptocurrency exchanges. Not all cryptocurrencies and ICO tokens are issued on new blockchains. In fact, most of them are created using other well-established blockchains, such as Ethereum’s blockchain. Most of the ICO crowdsales today rely on creating ERC-20 compliant tokens, which run on Ethereum’s blockchain.
This basic guide will walk you through the process of how to do an ICO.
Is your startup suitable for an ICO?
Some believe that an ICO can work for any project, enabling its creators to raise capital while avoiding the alternative long, daunting, and complex means of crowdfunding via more traditional avenues, such as an IPO.
In order for your token or coin to gain popularity among crypto investors, it should be an inseparable part of your project’s architecture. Potential investors should be able to clearly envision how your ICO’s token is supposed to acquire value as your project grows. Investors should be able to answer the following questions regarding your token:
- How will your project benefit from a blockchain-based cryptographic token?
- What can the distributed ledger technology add to your project?
- What are your startup’s ultimate goals?
- Why would potential investors be interested in buying your ICO’s tokens?
- Are there any competitors to your startup?
Authenticity and transparency are mandatory to your project and help investors to consider your project as legitimate. With the amount of ICOs that are launched on an almost daily basis, you have to prove to potential investors that your project is not simply a “get rich quick” scheme. Your ICO token must have clearly identifiable goals and be able to solve a specific problem.
You need to start thinking about having a team that can create and maintain your ICO crowdsale. The team must include blockchain developers, content creators, marketing specialists, graphic designers, social media managers, translators, and others. It is important to understand that you will have to pay salaries for your staff for at least six months, as they will be working for at least three months prior to the actual launch of the ICO crowdsale.
It is important to complete all of these steps before moving on to the next set of tasks.
Creating the ICO’s website
Just like most other business models today, a website is an important avenue to enable potential investors reach your product with ease, wherever their location in the world is. To put it plainly, investors won’t buy your ICO’s tokens if your project lacks a professionally designed website. It is pivotal to create an attractive website that includes all the data that potential investors might be looking for. An ICO website should include the following seven items.
As ICO crowdfunding is becoming a global phenomenon, your website should be translated into a few other languages, in addition to English. We recommend translating your website into Russian, Chinese, French, and Spanish. The more translations you are able to offer, the better.
2- The Homepage
Most successful ICOs have websites which contain a professionally designed landing page. On most ICO crowdfunding platforms, more than 90% of the data is present on the website’s landing page. Before the actual launch of the ICO crowdsale, most ICO campaigns present a countdown timer on the website’s landing page that marks the beginning of the crowdsale. Usually, the website also includes an email subscription form to keep investors up-to-date by opting in to receive news about the project. After the actual start of the ICO, the landing page occasionally adds a counter that shows the total amount raised via the ICO.
3- Detailing the Project
The website should include a section that details information regarding the project’s goals, technological innovations, roadmap, current status, and other relevant data. Such a section is important for investors, as it helps them understand what they are investing in. This section should include infographics, figures, and other graphics that illustrate the information in an attractive way.
4- The ICO Token
The most important segment of the website is where you describe the details of your ICO token. This section should include:
- The token’s name and ticker symbol.
- The uses of the token.
- The token’s price and offered bonuses, if available.
- The amount of tokens offered for sale during the ICO, as well as the total amount of tokens.
- How to get tokens for free from airdrops (if applicable).
- The start and end dates of the ICO sale.
- The percentage of tokens held by the project owners.
- The hard cap of the startup.
- Bounty campaigns.
5- Documents
The ICO’s website should have a section that includes the project’s documents, such as the whitepaper, legal paperwork, and the project’s roadmap. Links to these documents should be clearly visible on the website’s landing page. Security ICO tokens are now considered forms of securities that should comply with US Federal Securities’ laws, as per Section 21(a) of the SEC’s 1934 Securities Exchange Act. If your tokens will be offered to American investors, your website should include a section that presents the ICO’s SEC registration paperwork.
6- Social Media Channels
The website has to have a section that includes links to the ICO’s social media channels. Most successful ICO platforms create Telegram groups to communicate with investors and respond to their queries. Discord and Slack are also used by the best ICO projects. Links to all of the project’s social media channels should be clearly included in this section of the project’s website.
7- The ICO’s Team
There should be a section where all of the project’s team members are clearly presented. The name, photo, and role of every team member should be included in this section. You should also include a link to the LinkedIn profile of every team member.
The ICO’s whitepaper
Whitepapers are indispensable parts of ICO ecosystems. An ICO whitepaper is a document that includes the technical properties of the project and token in relative details. Whitepapers are supposed to target professionals, crypto experts, and blockchain developers that can understand the technical details of your ICO token and underlying project. A whitepaper is not supposed to focus on marketing and is more or less a form of educational manual. It is very important to map out the concept of your project before attempting to write a whitepaper. The whitepaper should include the following:
- The project’s goals, features, and roadmap.
- The problem the project is aiming to solve, its target audience, and the market where it is supposed to operate.
- The project’s team members and advisors.
- The project’s financial basics and the economics of the ICO token.
There are basic guidelines that must be followed when writing a whitepaper. These include:
- State the problem that the ICO’s project solves. Include relevant illustrations, charts, and infographics that detail the problem. After the problem is clearly presented, the description of the project should be detailed.
- Clearly structure the whitepaper in a clean and linear manner. It should not be colorful or contain a large amount of complex technical jargon or buzzwords. As mentioned earlier, whitepapers are aimed at professionals, rather than newbies or inexperienced investors, and should not include colorful logos or catchy marketing slogans. A whitepaper is an educational document that details the technical features of the token and the project’s details, rather than being focused on marketing or boosting sales.
- Thoroughly research other whitepapers of ICOs that are similar to yours. Consider their outlines and try to come up with a similarly professional whitepaper.
- On average, a professional whitepaper is between 15-20 pages. The most important thing is that when a potential investor goes through your whitepaper, they will understand the project, how the token will work, what the prospects of the project are, and how users are supposed to benefit from the offered service or product.
Issuing your ICO tokens on Ethereum’s blockchain
The following steps will show you how to issue a standard ERC20 token to use for your ICO project.
Note: This tutorial is inspired by Moritz Neto’s tutorial on Medium.
You will need the following:
- An Ethereum address – We recommend using MyEtherWallet.
- Ether – You will need this to pay for the execution of smart contracts. As your token will be issued first on a test network called “Ropsten network”, you won’t need real ether.
- A code editor, such as Notepad++ or Atom.
- A solidity smart contract.
Ethereum address
For this guide, we will issue an ERC20 token via a test network, so that you don’t have to spend real ether. We will utilize the Ropsten Test Network. You can learn how to issue a token on the live network with a guide that will be published in the near future.
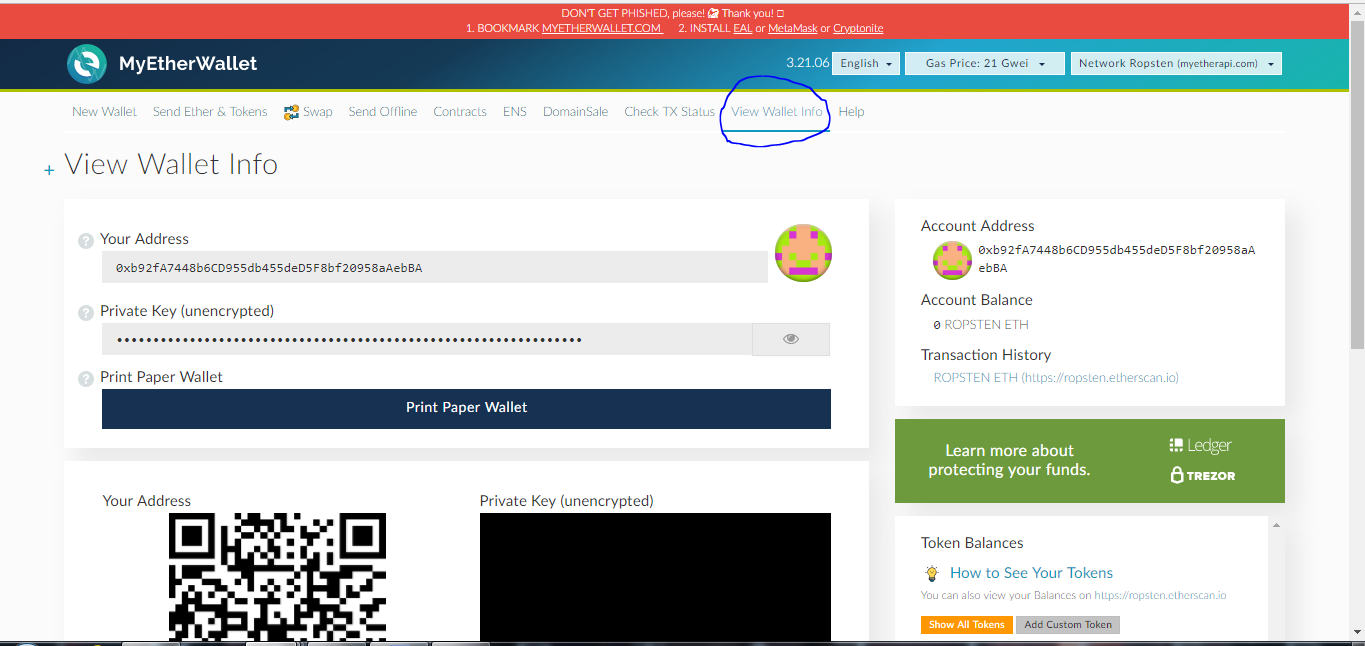
1- Go to MyEtherWallet’s website, and from the drop down list on the top right corner of the homepage, choose Network Ropsten (myetherapi.com) as shown on the below screenshot.

2- Login to your wallet via your private key, mnemonic phrase, etc. If you haven’t already created a wallet on MyEtherWallet, create one and choose “private key” as your login method. Store your private key in a safe place. Remember that you won’t be able to access your wallet if you lose your private key.
3- Click “view wallet info” on the top menu to be able to view your wallet’s address. You will be prompted to enter your private key again to unlock your wallet.
Acquiring Ropsten Ether
You can get Ropsten ether, which is not real ether, from this faucet: https://faucet.bitfwd.xyz/
Enter your Ropsten address at the above URL and the smart contract of the faucet will send you Ropsten ether.
Smart Contract
We will use the smart contract created by BokkyPooBah. You can download it by clicking HERE. We will edit this smart contract to create our token.
Editing the smart contract:
1- Open the smart contract in your code editor, e.g. Notepad++.
2- Line 4 includes the title of your smart contract. Change (0Fucks) to the title your will use for your smart contract.
3- Change Line 6 and add your Ropsten address which you created in MyEtherWallet.
4- Change Line 7 to add your token’s symbol, instead of (0FUCKS).
5- Change Line 8 to add the name of your token, instead of (0 Fucks Token).
6- Change Line 9 to the required total supply of tokens (100,000,000 by default).
7- Change Line 102 from “FucksToken” to (YourTokenName) and do the same thing in Line 115.
8- Change Line 116 and add the symbol name you chose earlier in the comments and make the same changes in Line 117.
9- Modify Line 120 to add the address you used earlier. This address is the one you created via MyEtherWallet. Repeat this for Line 121.
10- For Lines 118 and 119, do not modify. It is important to understand that the standard and maximum option is for tokens to have 18 decimals. This means that a token is split in 18 parts. For instance, if you want to create 100 tokens, within the total supply section, you have to enter 100 followed by the number of decimals you will choose. If you want to emit 100 tokens, you will set the total supply as 100,000,000,000,000,000,000.
11- Go to http://remix.ethereum.org/ and in the browser/ballot.sol add the code that we have just edited. Make sure that no red color appears. Any red color indicates that there is something wrong with the code you edited.
12- Now press the “start to compile” button and select the name of the token you are creating from the drop-down menu below the button. The name of your token should automatically be one of the choices appearing in the drop-down menu.
13- A special window will appear after you press the “start to compile” button, as shown on the below screenshot. Under “Bytecode”, press the “copy to clipboard” button. Copy the “object” ByteCode and add 0x in the beginning, so you would have “OxByteCode”.
14- Now, we will deploy the contract we just created on MyEtherWallet. Go to the “Contracts” tab and click the “Deploy Contract” button.
15- Paste the “ByteCode” you compiled into the ByteCode box. The gas limit will change automatically.
16- After accessing your wallet again via your private key, press “Sign transaction”, then “Deploy Transaction”. To make sure that the transaction has been executed, check the Ropsten test blockchain via https://ropsten.etherscan.io/.
17- Register the smart contract you created for your token. From MyEtherWallet’s window, go to the “Contract Code” tab and click “Verify and Publish”. You will be prompted by a window such as the one in the below screenshot. Fill in all the fields using the parameters you used in creating your token. Copy the whole code from the code editor, not the Bytecode, and paste it in the appropriate field. Add the code of the compiler you used via Remix’s page.
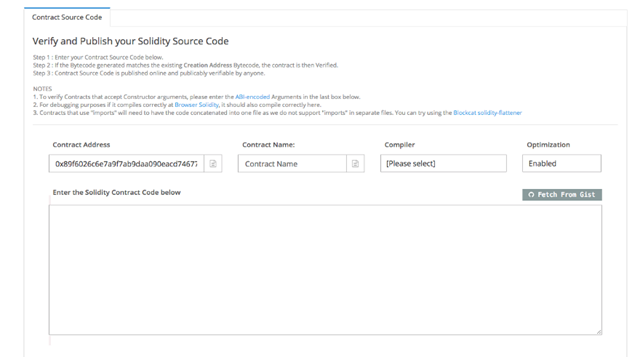
If you are prompted with a “Success” page, then you have successfully completed the process. However, if you get a red message, then there is something wrong. If this happens, check that you have copied and pasted the code correctly, as well as entered all the other parameters correctly, before trying again.
18- Confirm that the token works by going back to https://ropsten.etherscan.io/ and checking your MyEtherWallet address, not the address of the smart contract. If you can find all of your tokens there, then you have done it. Congratulations on successfully creating your Ethereum token!
Note: You will need to create a crowdsale contract to start your ICO. We will publish another tutorial to show you how to do a crowdsale smart contract.
Conclusion:
We hope this concise guide helped you better understand how to start your ICO project. We walked you through the process of planning your project, creating your website, writing your whitepaper, and creating your Ethereum-based token. An ICO is meant to be a simple means for crowdfunding intended to help anyone with limited resources to fund a project via issuing cryptographic tokens. These tokens will enable investors from any part of the world to fund your project by purchasing the tokens. We hope this guide can help you be part of the new era of ICOs and start your very own project.
Publish your ICO on Cointelligence to attract new investors today.
